Tuesday, May 24, 2016

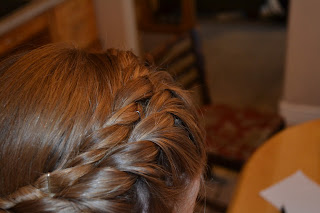
Dutch Braid to Low Bun By Amber


This hairstyle starts out like you are doing  a partial french braid only backwards . Also we are leaving some of the hair down on the sides.

You pull up the front section of hair.  Using a comb to start helps you have a guide.

 Divide it into three sections.
 Instead of braiding right over the middle, you go right under the middle.
 Then left  under the middle and continue on pulling the sections under instead of over.
 You add hair as you braid from each side back and forth.  Remember to leave hair partly down on the sides.
 

 On this particular hair style, you eyeball the parts on the sides.

 Do your best trying to follow the parts as you add hair.


 Continue until about 1 1/2 to 2 inches above the nape with hair hanging down underneath.
 Finish the braid off  and add an elastic.
  Pull the pieces out to make it look fuller.


  Roll the braid up underneath itself and pin in place.
 
 Take the rest of the hair and do a standard braid loosely.

 Add an elastic. 
 Pull the pieces out to make it look fuller than it is.  Start at the bottom so that you can adjust the elastic.
 Wrap it around the bun.
 Attach with a bobby pin underneath.
 Continue to add more bobby pins as needed.
 Pin tightly underneath.
 If you want it to sit high, pull it up and re-secure until it sits how you want.


Thursday, December 17, 2015

The Halo Twist by Amber

 
This is a double Halo Twist.
 
This is a single Halo Twist
 To start this hair style you need to move most of the hair in the front to one side.  Part it above the ear in a diagonal line toward the top of her head. 
 Then comb the hair over to the right.
Starting on the left grab a piece of hair over the ear.
Separate it into two pieces. 
 Twist from front to back.
 Then add a small amount of hair from the front.

 Twist, then add hair from the front again.
Each piece will alternate with each twist.
 keep grabbing only from the front then twist.

 Continue with this motion all the way around her face to her right ear.
 Just a tip, always smooth down the hair so it will lay flat. 
Once you get to her ear, You want the twist to be low close to the nape of her neck or just above.

 The twist must be held tight throughout the process.

 
 At this point you can put an elastic in it and call it good.


 To finish the hair style continue the twist until all of the hair is used.
 Then twist the pony tail and add a hair band at the end. 
 At this point you may need to twist the tail part again and hold tightly while you pin it in place following the original halo.

 Secure it right behind the first twist.
 Hide the end in the twist at the bottom.
 This does require several pins.  If it is not secure the twist will untwist on the second halo.


 This Halo Twist is done on shorter hair. In this picture the halo is further back on her head.
 It looks great with highlights.
The ends meet more on the top side. Hide the end behind the twist and secure.